Plugin information
| Version | 1.5.0 |
|---|---|
| Author | Dataiku |
| Released | 2019-12-03 |
| Last updated | 2023-07-01 |
| License | Apache Software License |
| Source code | Github |
| Reporting issues | Github |
This plugin provides a connector to Neo4J graph databases. Thanks to this recipe you will be able to perform different type of actions:
- export data from DSS to a Neo4J graph database
- import data from a Neo4J graph database to DSS
- run cypher queries in a Neo4J database using a macro
Table of contents
How to set up
If you are a Dataiku and Neo4j admin user, follow these configuration steps right after you install the plugin. If you are not an admin, you can forward this to your admin and scroll down to the How to use section. If you updated the plugin to a new version, make sure to update the code environment.
Create a Neo4j server configuration preset
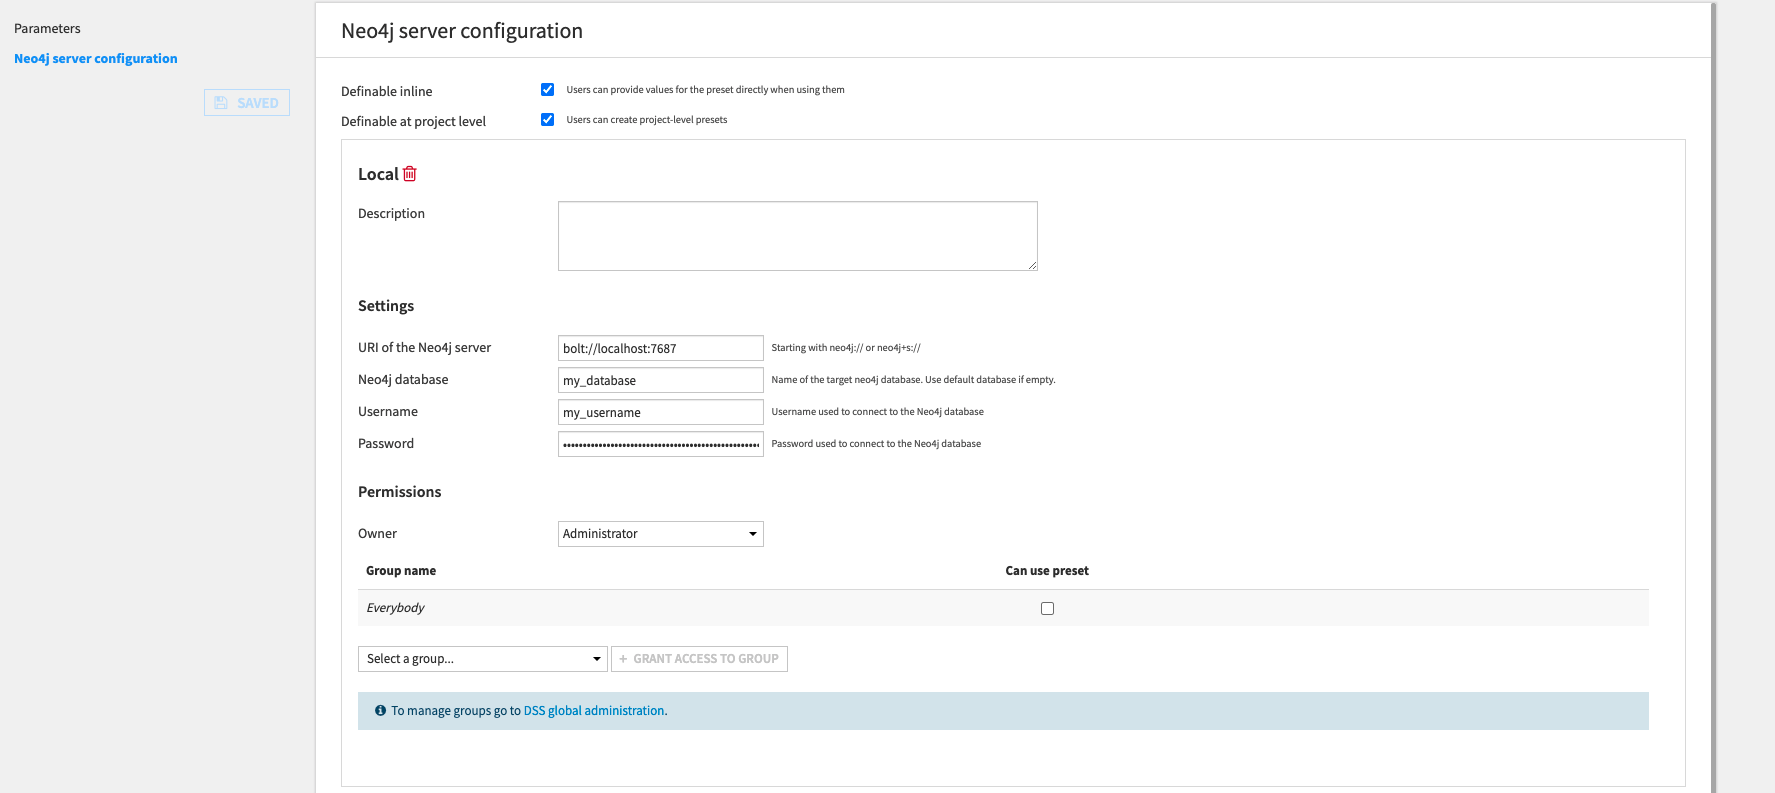
All the components of the plugin require that you know the credentials to connect to the Neo4j database (URI, username, password). You need to enter these parameters in a preset.
In Dataiku DSS, navigate to Plugins > Neo4j > Settings > Neo4j server configuration and create a preset with your Neo4j credentials.
You can create multiple presets that connect to different Neo4j databases and you can set specific permissions to them.
How to use
We will explain the plugin components using a graph of Football transfers as example.
Export relationships recipe
The goal of this recipe is to export a dataset containing relationships from DSS to a Neo4J graph database.
We have the following dataset in DSS of Football transfers:

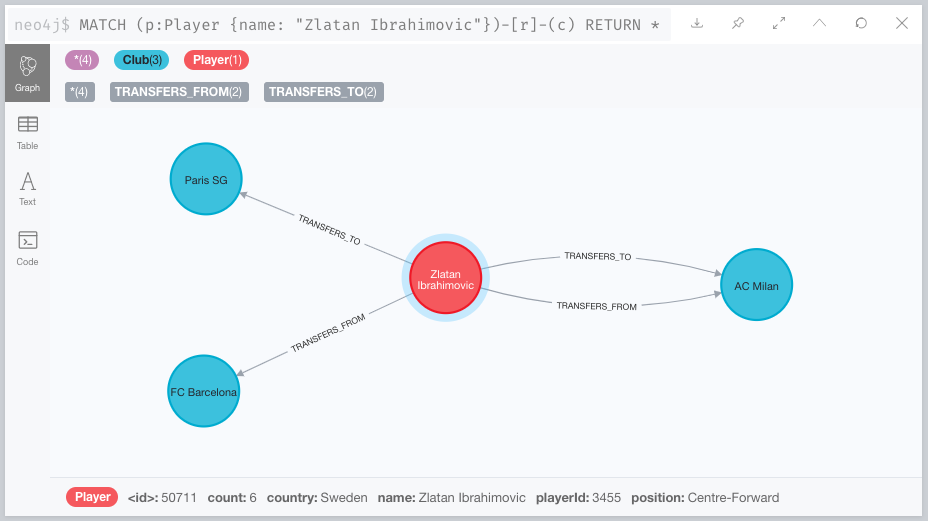
We want to create 2 types of nodes (Player and Club) and 2 types of relationships (TRANSFERS_TO and TRANSFERS_FROM) from this dataset in order to have the following graph in Neo4j:
(Club)<-[TRANSFERS_FROM]-(Player)-[TRANSFERS_TO]->(Club)
For that we will need to create two recipes, one for exporting the relationships ‘TRANSFERS TO’, and one for exporting the second type of relationships, ‘TRANSFERS FROM’.
First, create an Export relationships recipe from the + RECIPE button or from the right panel if your dataset is selected.
This recipe will create new nodes and relationships (and add their properties) from the input dataset. If some nodes and/or relationships already exist in the Neo4j database, then only the new properties are added and the new relationships are attached to the existing nodes.
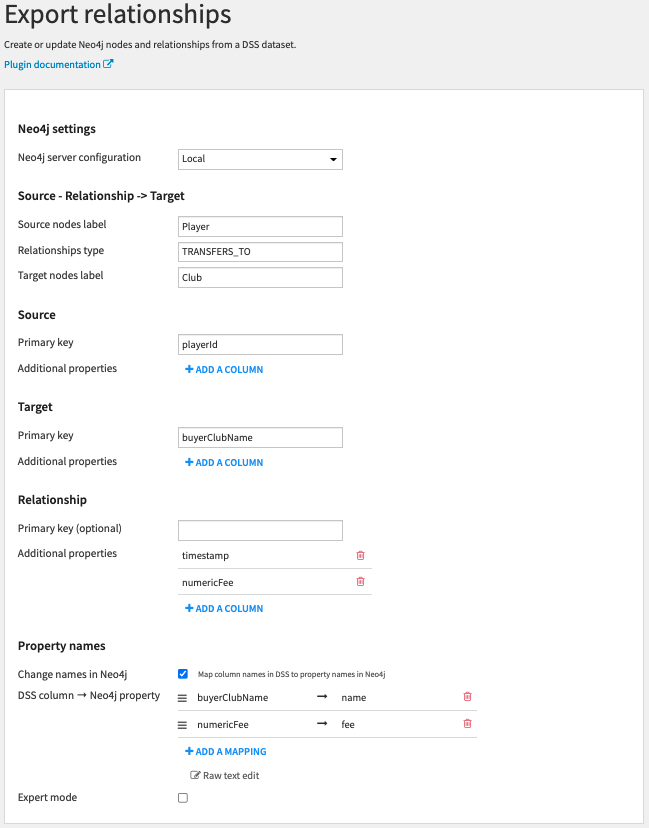
The following recipe is filled to create the (Player)-[TRANSFERS_TO]->(Club) relationships with 2 properties (timestamp and fee).
Settings
Neo4j settings
- Select a preset defined in the plugin settings that contains your Neo4j server URI and credentials.
Source – Relationship -> Target
- Enter the source and target node labels (they can be the same) and the relationship type that you want to create in Neo4j.
Source/Target:
- Primary key: Select a dataset column that corresponds to the primary key of the nodes (used to check whether a node already exists, should be unique). Primary key column cannot have null/empty value.
- Additional properties: Select columns that corresponds to other node properties that you want to add in Neo4j.
Relationship:
- Primary key: for relationships, this parameter is optional.
- Additional properties: Select columns that corresponds to other relationship properties that you want to add in Neo4j.
Property names:
- Change names in Neo4J: You can choose to rename the properties in Neo4j instead of using the DSS column names (useful when the source and target nodes have the same labels). For example, when the source and target nodes have the same labels but are 2 different columns in the DSS dataset, you can map both source and target columns to the same name.
- If the parameter is selected, you will be able to map the DSS column names to the names you want to use in Neo4J.
Expert mode:
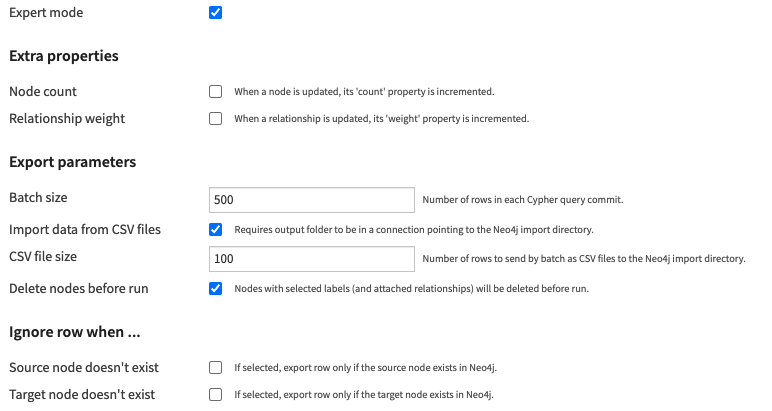
- You can activate the expert mode in order to set additional parameters.
Extra properties:
- Node count: If selected, nodes will have a count property that is incremented each time they are updated during the export.
- Relationship weight: If selected, relationships will have a weight property that is incremented each time they are updated during the export.
Export parameters:
- Batch size: Number of rows sent in each Cypher query commit (if you are using the “load from CSV files option”, this parameter corresponds to the PERIODIC COMMIT query hint of Neo4J).
- Import data from CSV files: By default data are sent directly to the Neo4j graph database using a Bolt network connection. Select this parameter if you want to send data to the Neo4j import directory instead and make use of the LOAD FROM CSV Cypher query. (Note: to use this option, you must create an output folder that is stored in a SCP/SFTP connection to Neo4j as explained here). If selected:
- CSV file size: The dataset is split into multiple CSV files of the selected size that are sent to the output folder.
- Delete nodes before run: If selected, nodes with selected labels and attached relationships will be deleted before exporting the relationships.
Ignore row when …:
- Source node doesn’t exist: If the source node of a row doesn’t exist, then the row is skipped.
- Target node doesn’t exist: If the target node of a row doesn’t exist, then the row is skipped.
Similarly, we can create the (Player)-[TRANSFERS_FROM]->(Club) relationships.
Export nodes recipe
We also have a dataset in DSS containing informations about the Football players:
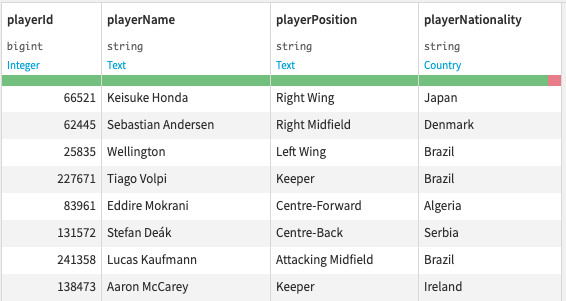
We want to use this dataset to add new properties to the Player nodes in the Neo4j database.
Now, create an Export nodes recipe.
This recipe will create new nodes (and add their properties) from the input dataset. If some nodes already exist in the Neo4j database, then only the new properties are added.
The following recipe is filled to add 3 new properties to the Player nodes (name, country and position) using playerId as primary key to to match nodes.
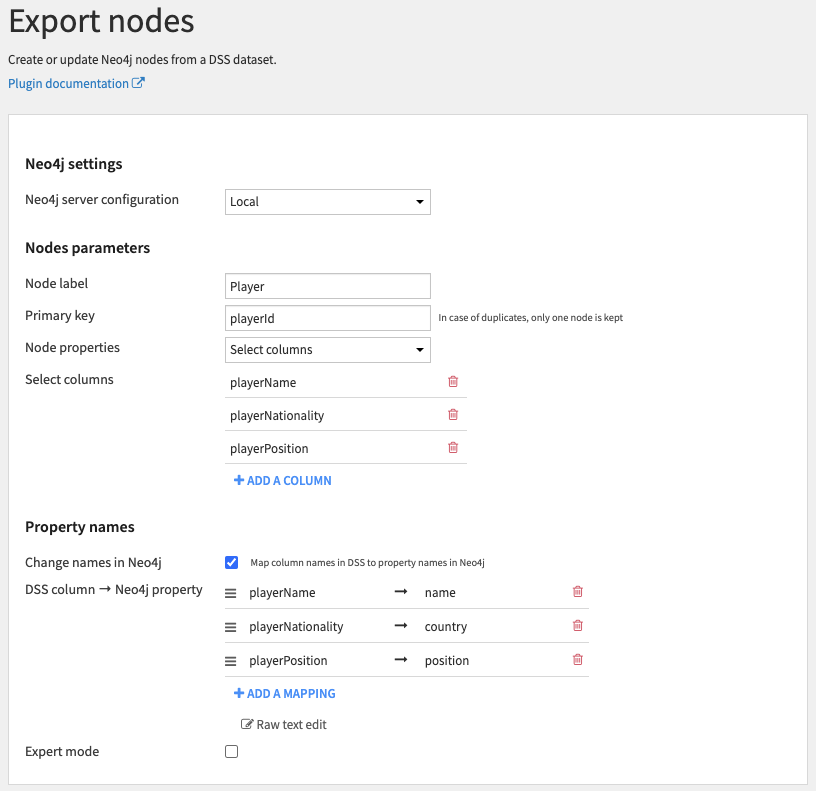
Settings work the same way as in the Export relationships recipe.
The complete flow described above looks like:
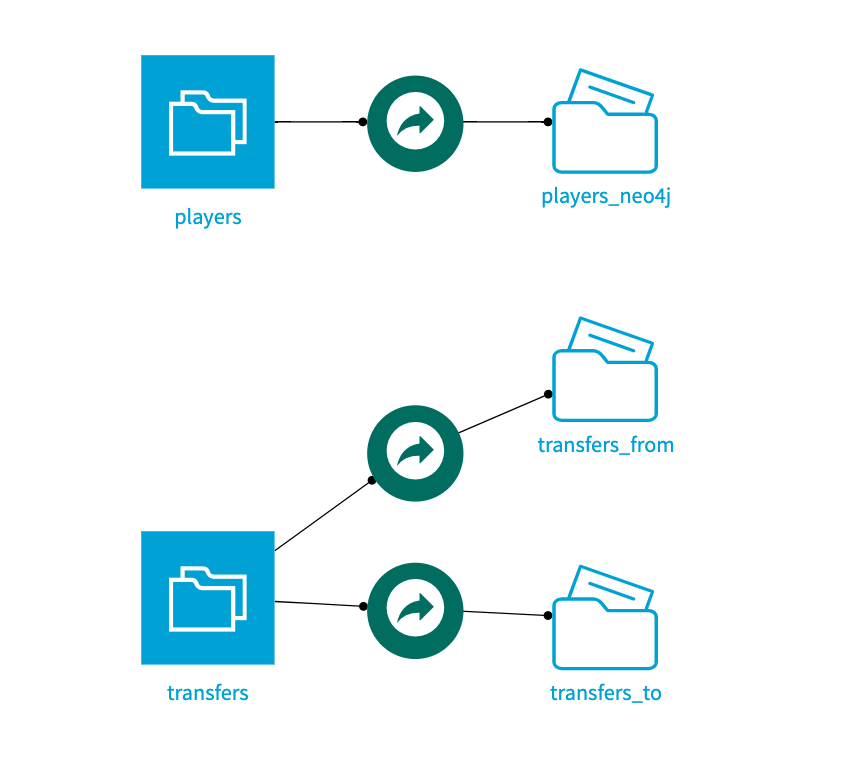
Here is an example of what the newly created graph looks like in the Neo4j desktop:
Macro
The macro can be used when a user needs to simply interact with the database and when no output Dataset is required. It could be used for instance to perform maintenance tasks on the database, create indices, test Cypher queries, delete nodes…
The macro can be used within a scenario to automate a process, for example exporting data to a Neo4J graph database and then running cypher queries on the updated/new Neo4J graph database.
All queries in the macro will be executed within the same commit (if one fail, none are executed). Queries must be separated by a semi-colon.
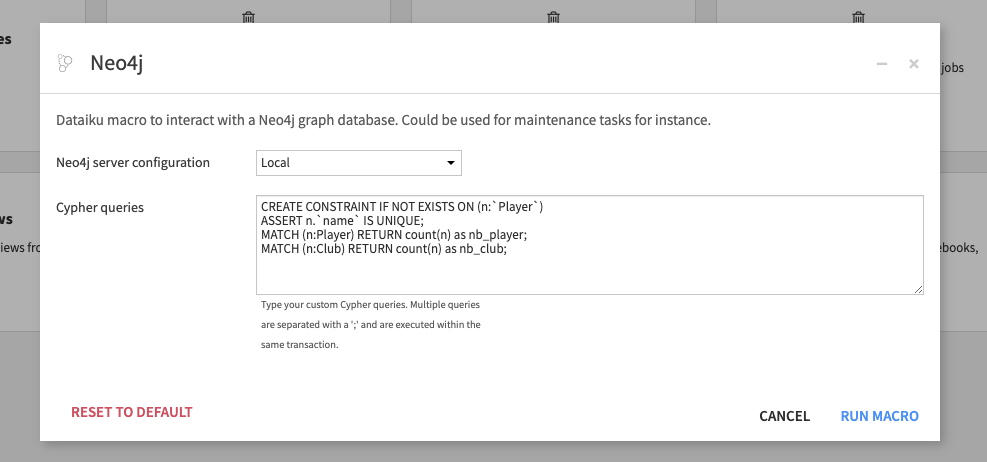
Dataset (import data from Neo4J)
The Dataset can be used to import data from Neo4j into DSS. It is available from the flow in + Dataset > Neo4j. This connector allows to retrieve either:
- all nodes (and their properties) with a given label
- all relationships (and their properties) with a given type
- any results of a custom Cypher query
Note that if you don’t enter any node label or relationship type, then it will retrieve a list of either all node labels or all relationship types.
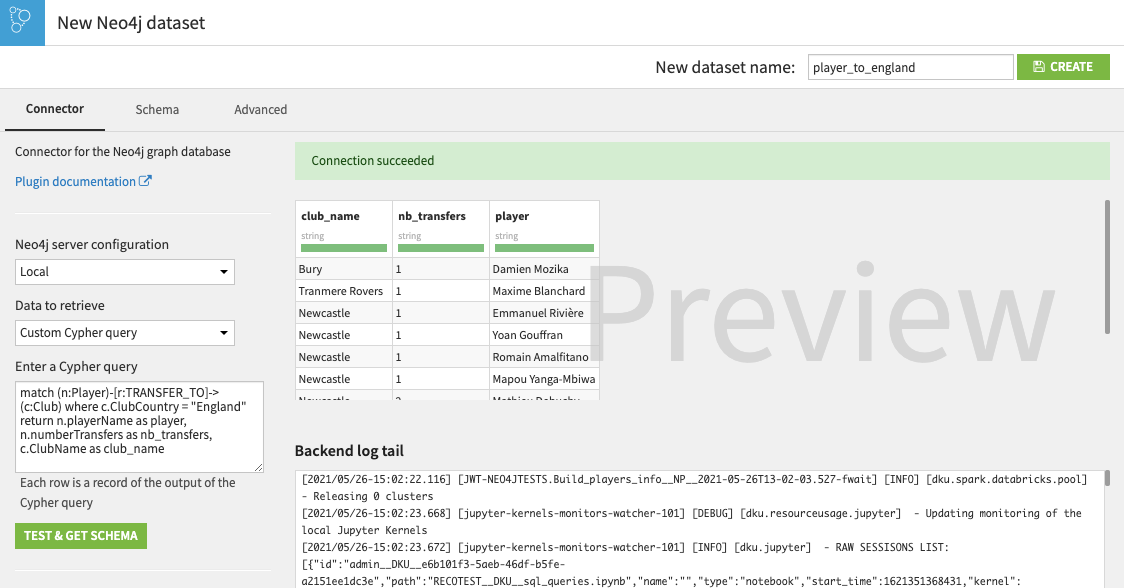
The resulting DSS Dataset can be used in a larger Flow and blended with other data sources as required, and could be the input of a ML model for example.
Additional info
Plugin limitations and improvements
- Neo4j 4.2 or 4.3 required.
- DSS 9.0.0 and higher required.
Import data from CSV files
In order to import data from CSV files (using the LOAD FROM CSV cypher query) in the 2 export recipes, you need to create a SCP/SFTP connection in DSS to the Neo4j import directory. The output of the export recipes will be folders stored in this connection. Dataiku unix user must have SSH access to the machine hosting Neo4j.
In Dataiku DSS, navigate to Administration > Connections > + New connection > SCP/SFTP and create a new connection with the Neo4j server address, unix user, key or password authentication and enter the path to the Neo4j import directory.
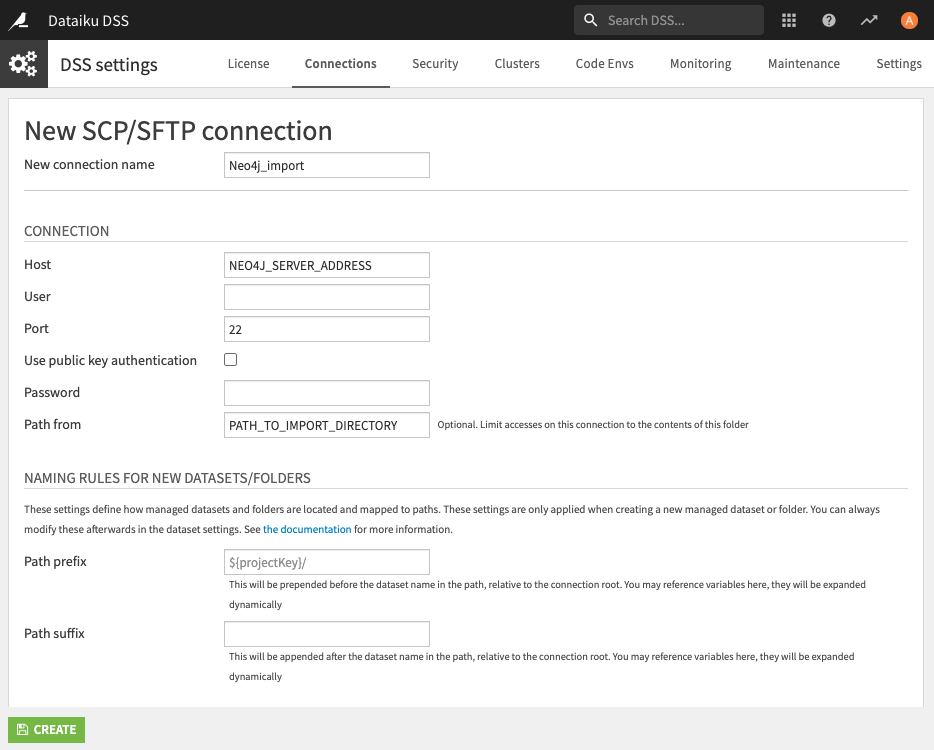
Contributing
You are welcome to contribute to this Plugin. Please feel free to use Github issues and pull requests.
